
Hello everyone, this is my Part 3 blog of Azure AD App Registration. In my previous posts, I talked about following:
In Part 1 https://www.leogether.com/2022/01/create-azure-ad-app-registration-using.html, I talked about creating app registration.
Then in Part 2 https://www.leogether.com/2022/01/azure-ad-app-registration-create-app.html, I talked about creating app roles.
In this post will be showing how to create scopes programmatically via PowerShell using MS Graph APIs.
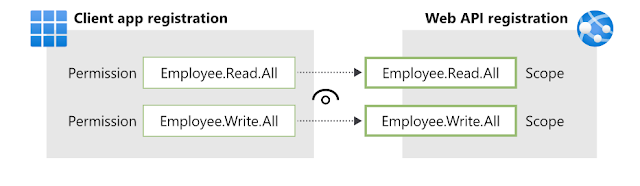
By configuring an application to expose a Web API to client apps through scopes, you can provide permissions-based access to its resources to authorized users and client apps that access your API.
The code in a client application requests permission to perform operations defined by your web API by passing an access token along with its requests to the protected resource (the web API). Your web API then performs the requested operation only if the access token it receives contains the scopes required for the operation.
This diagram from Microsoft documentation shows how Web API registration exposes scope and permissions are added to the client app's registration:
Understanding of Azure AD app registration is a pre-requisite for this, I recommend going through this documentation link https://docs.microsoft.com/en-us/azure/active-directory/develop/quickstart-configure-app-expose-web-apis, to get familiar with it.
The focus of this blog is only to show how to create scopes programmatically.
For creating a scope you will need to do the following:
Set Application ID URI
Application ID URI acts as the prefix for the scopes that you will reference in client code which is your API. It must be globally unique, I will prefer to use the default syntax as api://<application-client-api>
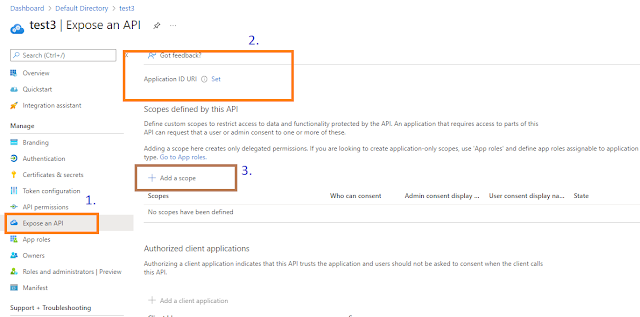
Specifying scope attributes
As in the "Add a scope pane" below:

For programmatically creating scopes, I have created a two scripts in my GitHub repository:
CreateScopes.ps1 - This is for creating scopes programmatically.
My GitHub repository link is:
https://github.com/Pujago/ApplicationRegistrationUsingMSGraphAPIs-Public
How the script works?
- CreateScopes.ps1 will first authenticate to Azure AD (using script ConnectToAzureAD.ps1)
- Then it will generate access token (using script GenerateToken.ps1). This token is used for calling MS Graph Rest API URL for updating the Application ID URI.
- It calls SetApplicationUri.ps1 to set the Application ID URI.
- Finally it will create the scopes.
CreateScopes.ps1 requires ConnectToAzureAD.ps1, GenerateToken.ps1, SetApplicationUri.ps1 to be in the same folder.
Before using script:
If you have not read my previous post, please click here https://www.leogether.com/2022/01/create-azure-ad-app-registration-using.html to follow the sections for:
- Pre-requisites
- Create master App Registration
- Generate Access Token
If you have already done that, you do not need to repeat the above steps.
How to run the script?
Please follow the steps below to use the repository:
- Go to the link: https://github.com/Pujago/ApplicationRegistrationUsingMSGraphAPIs-Public
- Clone the repository.
- Open the powershell terminal, go to the repository location, go to scripts folder.
- Edit the GenerateToken.ps1 and update your credentials i.e. tenant Id, client Id and secret.
Connect to Azure account:
$ServicePrincipalPW="<Master app registration client secret>"
$passwd = ConvertTo-SecureString $ServicePrincipalPW -AsPlainText -Force
Run the script:
Optional Pre-Authorize Client Apps


0 comments:
Post a Comment