
In this blog, we will look at how to create infrastructure in Azure using Terraform in a deployment pipeline using Azure. Terraform is an open-source tool for building, changing, and versioning infrastructure safely and efficiently.
I will guide you through the process of creating a Kubernetes cluster on Azure using Terraform and Azure DevOps. There is quite a bit of moving parts to configure and run through a series of steps to make it work. We will go step by step to perform a list of activities as below:
- Creating Service Principal and Client Secret using Azure CLI.
- Creating ssh key which can be used to pass through the terraform, and terraform will pass through that to AKS and we can use that to access the machines running on the Kubernetes.
- Running Bash script to create Azure Storage and Azure Vault.
- Creating the Azure DevOps pipeline to deploy ACR and Kubernetes cluster using terraform configuration files.
The diagrams below show the overall process:
The above diagram shows that the bash script is run to create the storage container and azure vault secrets. A storage container is needed for terraform to maintain terraform state file and Azure key vault is needed to store secrets like app id, password, tenant id, subscription id and storage account key (all this is explained later in more detail)
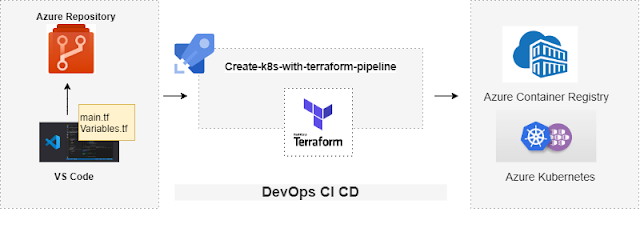
The 2nd diagram is to show how to create an Azure DevOps CI/CD pipeline that will deploy and manage an Azure environment using Terraform. So terraform configuration files are pushed to the Azure DevOps repository and the YAML pipeline is created that uses the configuration files to create the Azure Container Registry and Azure Kubernetes cluster.
Before starting, you will need to have:
1. Azure Portal free account
2. Azure DevOps account
3. Azure CLI installed
4. Install Terraform
I will also assume you already have working knowledge of Azure, Azure DevOps, Terraform, Docker, and Kubernetes as it will be hard to cover everything here.
Terraform configuration files:
I have already created 3 terraform configurations files to create the resources in Azure - main.tf, variables.tf, and output.tf
main.tf is where the actual code is located to create Azure Kubernetes cluster and Container Registry and creating a storage backend to maintain the state of the terraform.
I have added these files in GitHub: https://github.com/Pujago/DeployK8sInsfrastructureUsingTerraform
We will be using these files to create a DevOps pipeline to deploy the infrastructure using Terraform.
Let's start with hands-on:
Creating a Service Principal and a Client Secret
Using a Service Principal also knows as SPN, is a best practice for DevOps. You need a service principal to be able to talk to Azure.
To authenticate using Azure CLI, use the below command:
az login
This will launch the browser and after authenticating your account, you will see as below:

Next we need to create SPN and grant Contributor rights. I am creating an SPN with the name "terraformstatesp" as below:

Please take a note of appId, password, and tenant and subscription id as we will be storing these as secrets in Azure Vault.
To see SPN created in Azure Portal, go to Azure Active Directory -> App Registration -> All Applications.
Generate ssh key:
As mentioned before, it can be used to pass through the terraform, and terraform will pass through that to AKS and we can use that to access the machines running on the Kubernetes.
You can either bring your own key or create using the command below:
ssh-keygen -m PEM -t rsa -b 4096
You will see 2 files created under the directory:
Please make sure to move these to different locations and should not be committed to your repository.
Once SPN is created, we will be creating the following resources in the AZURE using a shell script.
1. Create the Azure Resource Group
We must create a Resource Group to store everything in it.
2. Create a Storage Account using the Azure command line
This is required to maintain the state of Terraform in Azure Storage. By default, the Terraform state is stored locally when you run the terraform apply command and also it stores sensitive data in cleartext. This is not suitable when we are working in a team where we need to collaborate and share the state file, so we need to store a state in a remote backend. So we will create a storage account in Azure to use it as a backend for Terraform state.
- Creating a storage account has few commands to run:
- Creating a storage account - This will be created in the resource group created in Step 1.
- Get the storage Account Key - This is needed to allow Terraform to save the state files to the storage account, and also to create a storage container. Please note this account key to store in Azure Vault as a secret so that it can be used by Terraform.
- Create the storage container - Create a storage blob container.
3. Create Azure Vault
We will create an Azure Vault to store appId, password, and tenant, and storage account key. And allow SPN to access the key vault.
I ran this script file in the git bash:
Once done, you can go to the Azure Portal to verify if all the resources are created successfully.
Creating the Azure DevOps pipeline:
Let us do the steps needed to set up the Azure pipeline:
Create a new project:
Now go to your Azure Dev Ops account and create a new project:
I have already created my project as below:
Commit Terraform configuration files to Azure Repos :
Go inside the project and Click on Repos, clone the repo in your local:
It will open a window to authenticate your credentials:
Add your folder where terraform configuration files are present and push the code:
You will see the files in the under repos in AzureDevOps project as below:
So now you have your terraform configurations files committed to Azure Repos under your project.
Create an Azure Service Connection:
This is used to create a connection between Azure DevOps and Azure subscription.
Go to Project Settings (bottom left) -> Click on Service Connections -> Create Service Connection
and follow the screenshots below:
Select your subscription:
And your service connection is ready:
Create a variable group:
The next step will be to do create a variable group to fetch the variables from the Azure Key Vault.
Go to your project pipeline -> Click on the Library -> Click on +Variable group button
Add a variable group name as below and click on Authorize button, then click on Add variables and select all Azure Vault secrets.
Finally, save the Variable group.
Add ssh key id as a secure file in the project library
Add the pub file created previously using ssh-keygen
Install Terraform Azure DevOps Extension:
We need to install the terraform Extension from the market place, links to install that are:
Create an Azure DevOps pipeline:
Now all is set to create the pipeline to deploy infrastructure using Terraform. Go to the pipeline and select "Create Pipeline".
Select Azure Repos Git under "Where is your code?"
Select your repository
Select Started pipeline under "Configure your pipeline"
Rename your pipeline:
Remove the existing code and replace with the code located here:
The code is self-explanatory with comments on each line. Please change the storage name, resource group, key vault names as per your resource names in your Azure portal.
Once done click on Run to run the pipeline.
It will ask for Granting permission here will permit the use of the Secure file 'azure_rsa.pub' for all waiting and future runs of this pipeline. You will see the job running as below:
Once completed, you can see the Azure Kubernetes cluster and Azure Container Registry in Azure Portal.
Now the environment is deployed and ready and it is managed by Terraform and Azure DevOps. We can now use CI/CD to make changes to the configuration file and Azure DevOps and Terraform will automatically take care of it. Let's try to change something in the Terraform configuration file.
I have currently 3 nodes deployed in the Kubernetes cluster, as in the Terraform variables.tf, it is set to 3.
I will change it to 4 and commit the file to Azure DevOps repos.
Once changes are pushed, it will trigger the pipeline as below:
If you go to the see the steps and go to Terraform Plan, you will see the plan states that cluster will be updated.
Ad nodes will be updated to 4
This marks the end of this blog.
In my next blog, I will show you how to deploy the .net microservice on this Kubernetes cluster using Azure DevOps. Please follow the link below to deploy microservice in the Kubernetes cluster created above via DevOps YAML pipeline:
Note: Please do not clean up resources once done.
1. Uncomment Terraform destroy from the YAML file and run the pipeline again. This will destroy all resources created via this pipeline:
2. To delete other resources created via script file, delete the resource group in Portal or via CLI:
az group delete -n <RESOURCE_GROUP_NAME>


Thanks for this blog, keep sharing your thoughts like this...
ReplyDeleteWhat is Microsoft Azure
Microsoft Azure Benefits